Security
|
Preview | Unofficial | For review only |
There are three main components to the security features provided by Cassandra:
-
TLS/SSL encryption for client and inter-node communication
-
Client authentication
-
Authorization
By default, these features are disabled as Cassandra is configured to easily find and be found by other members of a cluster. In other words, an out-of-the-box Cassandra installation presents a large attack surface for a bad actor. Enabling authentication for clients using the binary protocol is not sufficient to protect a cluster. Malicious users able to access internode communication and JMX ports can still:
-
Craft internode messages to insert users into authentication schema
-
Craft internode messages to truncate or drop schema
-
Use tools such as
sstableloaderto overwritesystem_authtables -
Attach to the cluster directly to capture write traffic
Correct configuration of all three security components should negate these vectors. Therefore, understanding Cassandra’s security features is crucial to configuring your cluster to meet your security needs.
New Cluster Checklist
Before you turn on security features for a new cluster, decide these items first:
-
turn on TLS for client traffic
-
turn on TLS for internode traffic
-
choose the JMX access model you will use during bootstrap and after the node joins the ring
-
set the
system_authreplication factor before you enable password authentication -
create a non-default superuser and disable the default
cassandralogin once bootstrap is complete -
decide whether clients will use password auth, mTLS, or both during the transition period
TLS/SSL Encryption
Cassandra provides secure communication between a client machine and a database cluster and between nodes within a cluster. Enabling encryption ensures that data in flight is not compromised and is transferred securely. The options for client-to-node and node-to-node encryption are managed separately and may be configured independently.
In both cases, the JVM defaults for supported protocols and cipher
suites are used when encryption is enabled. These can be overidden using
the settings in cassandra.yaml, but this is not recommended unless
there are policies in place which dictate certain settings or a need to
disable vulnerable ciphers or protocols in cases where the JVM cannot be
updated.
FIPS compliant settings can be configured at the JVM level and should not involve changing encryption settings in cassandra.yaml. See the java document on FIPS for more details.
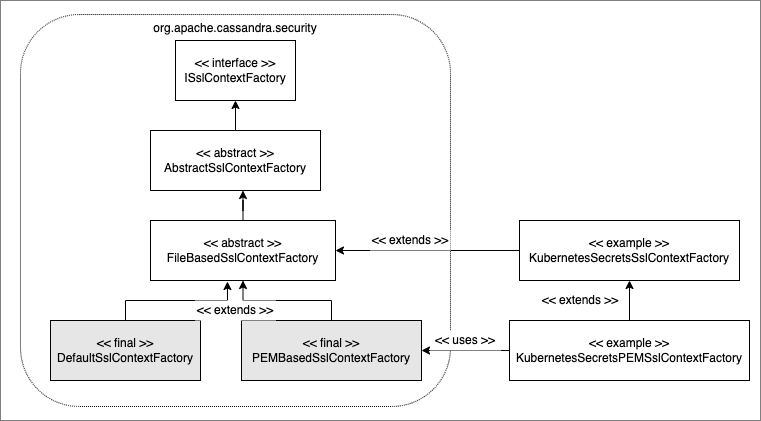
Cassandra provides flexibility of using Java based key material or completely customizing the SSL context. You can choose any keystore format supported by Java (JKS, PKCS12 etc) as well as other standards like PEM. You can even customize the SSL context creation to use Cloud Native technologies like Kuberenetes Secrets for storing the key material or to integrate with your in-house Key Management System.
For information on generating the keystore and truststore files required with the Java supported keystores used in SSL communications, see the java documentation on creating keystores.
For customizing the SSL context creation you can implement
ISslContextCreationFactory
interface or extend one of its public subclasses appropriately. You
can then use the ssl_context_factory setting for
server_encryption_options or client_encryption_options sections
appropriately. See ssl-factory examples
for details. Refer to the below class diagram to understand the
class hierarchy.
Using PEM based key material
You can use the in-built class PEMBasedSSLContextFactory as the
ssl_context_factory setting for the PEM based key material.
You can configure this factory with either inline PEM data or with the files having the required PEM data as shown below,
-
Configuration: PEM keys/certs defined in-line (mind the spaces in the YAML!)
   client/server_encryption_options:
     ssl_context_factory:
        class_name: org.apache.cassandra.security.PEMBasedSslContextFactory
        parameters:
            private_key: |
             -----BEGIN ENCRYPTED PRIVATE KEY----- OR -----BEGIN PRIVATE KEY-----
             <your base64 encoded private key>
             -----END ENCRYPTED PRIVATE KEY----- OR -----END PRIVATE KEY-----
             -----BEGIN CERTIFICATE-----
             <your base64 encoded certificate chain>
             -----END CERTIFICATE-----

            private_key_password: "<your password if the private key is encrypted with a password>"

            trusted_certificates: |
              -----BEGIN CERTIFICATE-----
              <your base64 encoded certificate>
-----END CERTIFICATE------
Configuration: PEM private key’s password specified via a file
   client/server_encryption_options:
     ssl_context_factory:
        class_name: org.apache.cassandra.security.PEMBasedSslContextFactory
        parameters:
            private_key: |
             -----BEGIN ENCRYPTED PRIVATE KEY----- OR -----BEGIN PRIVATE KEY-----
             <your base64 encoded private key>
             -----END ENCRYPTED PRIVATE KEY----- OR -----END PRIVATE KEY-----
             -----BEGIN CERTIFICATE-----
             <your base64 encoded certificate chain>
             -----END CERTIFICATE-----
            trusted_certificates: |
              -----BEGIN CERTIFICATE-----
              <your base64 encoded certificate>
              -----END CERTIFICATE-----
keystore_password_file: "<file having your password for the encrypted private key>"-
Configuration: PEM keys/certs defined in files
    client/server_encryption_options:
     ssl_context_factory:
        class_name: org.apache.cassandra.security.PEMBasedSslContextFactory
     keystore: <file path to the keystore file in the PEM format with the private key and the certificate chain>
     keystore_password: "<your password if the private key is encrypted with a password>"
truststore: <file path to the truststore file in the PEM format>-
Configuration: PEM private key’s password specified via a file
   client/server_encryption_options:
     ssl_context_factory:
        class_name: org.apache.cassandra.security.PEMBasedSslContextFactory
     keystore: <file path to the keystore file in the PEM format with the private key and the certificate chain>
     keystore_password_file: "<file having your password for the encrypted private key>"
     truststore: <file path to the truststore file in the PEM format>
SSL Certificate Hot Reloading
Beginning with Cassandra 4, Cassandra supports hot reloading of SSL Certificates. If SSL/TLS support is enabled in Cassandra and you are using default file based key material, the node periodically (every 10 minutes) polls the Trust and Key Stores specified in cassandra.yaml. When the files are updated, Cassandra will reload them and use them for subsequent connections. Please note that the Trust & Key Store passwords are part of the yaml so the updated files should also use the same passwords.
If you are customizing the SSL configuration via ssl_context_factory
setting, Cassandra polls (at the same periodic interval mentioned above)
your implementation to check if the SSL certificates need to be
reloaded. See the ISslContextFactory documentation for more details.
If you are using one of the Cassandra’s in-built SSL context factory
class (example: PEMBasedSslContextFactory) with file based key
material, it supports the hot reloading of the SSL certificates like
mentioned above.
Certificate Hot reloading may also be triggered using the
nodetool reloadssl command. Use this if you want to Cassandra to
immediately notice the changed certificates.
Inter-node Encryption
The settings for managing inter-node encryption are found in
cassandra.yaml in the server_encryption_options section. To enable
inter-node encryption, change the internode_encryption setting from
its default value of none to one value from: rack, dc or all.
Client to Node Encryption
The settings for managing client to node encryption are found in
cassandra.yaml in the client_encryption_options section. There are
two primary toggles here for enabling encryption, enabled and
optional.
-
If neither is set to
true, client connections are entirely unencrypted. -
If
enabledis set totrueandoptionalis set tofalse, all client connections must be secured. -
If both options are set to
true, both encrypted and unencrypted connections are supported using the same port. Client connections using encryption with this configuration will be automatically detected and handled by the server.
|
Breaking change in Cassandra 6.0 (CASSANDRA-19397)
Why it was removed: Running separate native transport ports for encrypted and
unencrypted traffic caused incorrect entries in Migration steps for operators upgrading from 5.0:
Example Example |
Roles
Cassandra uses database roles, which may represent either a single user
or a group of users, in both authentication and permissions management.
Role management is an extension point in Cassandra and may be configured
using the role_manager setting in cassandra.yaml. The default
setting uses CassandraRoleManager, an implementation which stores role
information in the tables of the system_auth keyspace.
Keep these terms distinct:
-
roleis the authorization object stored in Cassandra -
useris a role withLOGIN = true -
principalis the authenticated caller seen by the server -
identityis an external credential string, such as an mTLS certificate identity, that can be mapped to a role
See also the CQL documentation on roles.
Authentication
Authentication is pluggable in Cassandra and is configured using the
authenticator setting in cassandra.yaml. Cassandra ships with two
options included in the default distribution.
By default, Cassandra is configured with AllowAllAuthenticator which
performs no authentication checks and therefore requires no credentials.
It is used to disable authentication completely. Note that
authentication is a necessary condition of Cassandra’s permissions
subsystem, so if authentication is disabled, effectively so are
permissions.
The default distribution also includes PasswordAuthenticator, which
stores encrypted credentials in a system table. This can be used to
enable simple username/password authentication.
Enabling Password Authentication
Before enabling client authentication on the cluster, client applications should be pre-configured with their intended credentials. When a connection is initiated, the server will only ask for credentials once authentication is enabled, so setting up the client side config in advance is safe. In contrast, as soon as a server has authentication enabled, any connection attempt without proper credentials will be rejected which may cause availability problems for client applications. Once clients are setup and ready for authentication to be enabled, follow this procedure to enable it on the cluster.
Pick a single node in the cluster on which to perform the initial configuration. Ideally, no clients should connect to this node during the setup process, so you may want to remove it from client config, block it at the network level or possibly add a new temporary node to the cluster for this purpose. On that node, perform the following steps:
|
Do not restart a node for authentication until |
-
Open a
cqlshsession and change the replication factor of thesystem_authkeyspace. By default, this keyspace usesSimpleReplicationStrategyand areplication_factorof 1. It is recommended to change this for any non-trivial deployment to ensure that should nodes become unavailable, login is still possible. Best practice is to configure a replication factor of 3 to 5 per-DC.
ALTER KEYSPACE system_auth WITH replication = {'class': 'NetworkTopologyStrategy', 'DC1': 3, 'DC2': 3};|
If you are increasing the |
-
Edit
cassandra.yamlto change theauthenticatoroption like so:
authenticator: PasswordAuthenticator-
Restart the node.
-
Open a new
cqlshsession using the credentials of the default superuser:
$ cqlsh -u cassandra -p cassandra-
During login, the credentials for the default superuser are read with a consistency level of
QUORUM, whereas those for all other users (including superusers) are read atLOCAL_ONE. In the interests of performance and availability, as well as security, operators should create another superuser and disable the default one. This step is optional, but highly recommended. While logged in as the default superuser, create another superuser role which can be used to bootstrap further configuration.
# create a new superuser
CREATE ROLE dba WITH SUPERUSER = true AND LOGIN = true AND PASSWORD = 'super';-
Start a new cqlsh session, this time logging in as the new_superuser and disable the default superuser.
ALTER ROLE cassandra WITH SUPERUSER = false AND LOGIN = false;-
Finally, set up the roles and credentials for your application users with
CREATE ROLEstatements.
At the end of these steps, the one node is configured to use password
authentication. To roll that out across the cluster, repeat steps 2 and
3 on each node in the cluster. Once all nodes have been restarted,
authentication will be fully enabled throughout the cluster.
Only continue once the system_auth change is in place on the cluster
and the credential data is present on the replicas that will serve
logins.
Note that using PasswordAuthenticator also requires the use of
CassandraRoleManager.
See also: setting-credentials-for-internal-authentication,
CREATE ROLE,
ALTER ROLE,
ALTER KEYSPACE and
GRANT PERMISSION.
Authorization
Authorization is pluggable in Cassandra and is configured using the
authorizer setting in cassandra.yaml. Cassandra ships with two
options included in the default distribution.
By default, Cassandra is configured with AllowAllAuthorizer which
performs no checking and so effectively grants all permissions to all
roles. This must be used if AllowAllAuthenticator is the configured
authenticator.
The default distribution also includes CassandraAuthorizer, which does
implement full permissions management functionality and stores its data
in Cassandra system tables.
Enabling Internal Authorization
Permissions are modelled as a whitelist, with the default assumption that a given role has no access to any database resources. The implication of this is that once authorization is enabled on a node, all requests will be rejected until the required permissions have been granted. For this reason, it is strongly recommended to perform the initial setup on a node which is not processing client requests.
The following assumes that authentication has already been enabled via
the process outlined in password-authentication. Perform these steps
to enable internal authorization across the cluster:
-
On the selected node, edit
cassandra.yamlto change theauthorizeroption like so:
authorizer: CassandraAuthorizer-
Restart the node.
-
Open a new
cqlshsession using the credentials of a role with superuser credentials:
$ cqlsh -u dba -p super-
Configure the appropriate access privileges for your clients using GRANT PERMISSION statements. On the other nodes, until configuration is updated and the node restarted, this will have no effect so disruption to clients is avoided.
GRANT SELECT ON ks.t1 TO db_user;-
Once all the necessary permissions have been granted, repeat steps 1 and 2 for each node in turn. As each node restarts and clients reconnect, the enforcement of the granted permissions will begin.
See also: GRANT PERMISSION,
GRANT ALL and
REVOKE PERMISSION.
Caching
Enabling authentication and authorization places additional load on the
cluster by frequently reading from the system_auth tables.
Furthermore, these reads are in the critical paths of many client
operations, and so has the potential to severely impact quality of
service. To mitigate this, auth data such as credentials, permissions
and role details are cached for a configurable period. The caching can
be configured (and even disabled) from cassandra.yaml or using a JMX
client. The JMX interface also supports invalidation of the various
caches, but any changes made via JMX are not persistent and will be
re-read from cassandra.yaml when the node is restarted.
Each cache has 3 options which can be set:
- Validity Period
-
Controls the expiration of cache entries. After this period, entries are invalidated and removed from the cache.
- Refresh Rate
-
Controls the rate at which background reads are performed to pick up any changes to the underlying data. While these async refreshes are performed, caches will continue to serve (possibly) stale data. Typically, this will be set to a shorter time than the validity period.
- Max Entries
-
Controls the upper bound on cache size.
The naming for these options in cassandra.yaml follows the convention:
-
<type>_validity_in_ms -
<type>_update_interval_in_ms -
<type>_cache_max_entries
Where <type> is one of credentials, permissions, or roles.
As mentioned, these are also exposed via JMX in the mbeans under the
org.apache.cassandra.auth domain.
JMX access
Access control for JMX clients is configured separately to that for CQL. For both authentication and authorization, two providers are available; the first based on standard JMX security and the second which integrates more closely with Cassandra’s own auth subsystem.
Choose the JMX path before you change any settings:
| Need | Choose | Why |
|---|---|---|
Local-only access during bootstrap |
Standard local JMX |
Keeps access simple while the node is still joining. |
Remote access with simple credentials |
Standard JMX auth with SSL |
Fastest path when you do not need Cassandra roles for JMX. |
Remote access controlled by Cassandra roles |
Cassandra integrated auth |
Reuses CQL roles, but only after the node has joined the ring. |
Any remote JMX access over the network |
Add SSL |
JMX credentials should not travel in clear text. |
The default settings for Cassandra make JMX accessible only from
localhost. To enable remote JMX connections, edit cassandra-env.sh
to change the LOCAL_JMX setting to
no. Under the standard configuration, when remote JMX connections are
enabled, standard JMX authentication <standard-jmx-auth> is also
switched on.
Note that by default, local-only connections are not subject to authentication, but this can be enabled.
If enabling remote connections, it is recommended to also use
SSL connections.
Finally, after enabling auth and/or SSL, ensure that tools which use
JMX, such as nodetool are correctly configured and working
as expected.
JMX Configuration in cassandra.yaml (Cassandra 6.0, CASSANDRA-11695)
Starting with Cassandra 5.0 (and present in 6.0), JMX server configuration can
be placed entirely in cassandra.yaml under the jmx_server_options section.
This is the recommended approach for new deployments. It centralises all JMX
settings in a single file and avoids exposing SSL credentials in the JVM process
listing (ps output).
|
"Configure either jmx_server_options in cassandra.yaml and comment out configure_jmx function call in cassandra-env.sh or keep cassandra-env.sh to call configure_jmx function but you have to keep jmx_server_options in cassandra.yaml commented out." Source: |
The jmx_server_options block is commented out by default. To use it, uncomment
and configure the section in cassandra.yaml, then comment out the
configure_jmx function call in cassandra-env.sh.
jmx_server_options fields
The following fields are available under jmx_server_options
(JMXServerOptions.java on trunk):
enabled(boolean)-
Whether the JMX server is active. Set to
trueto start the JMX listener. remote(boolean)-
false(default) restricts JMX to localhost only. Set totrueto accept remote connections. When enabling remote connections, also configure SSL viajmx_encryption_options(see JMX With SSL). jmx_port(int, default 7199)-
Port the JMX server listens on.
rmi_port(int, default 7199)-
Port the RMI registry listens on. Can match
jmx_portunless SSL is enabled, in which case RMI and JMX ports may need to differ. authenticate(boolean)-
Enable JMX authentication. When
true, one of the auth mechanisms below must be configured. password_file(string, redacted in virtual tables)-
Path to the JMX password file (standard JMX auth). Equivalent to
-Dcom.sun.management.jmxremote.password.filein the legacy approach. access_file(string)-
Path to the JMX access file (standard JMX auth). Equivalent to
-Dcom.sun.management.jmxremote.access.file. login_config_name(string)-
JAAS login configuration name for Cassandra integrated auth. Equivalent to
-Dcassandra.jmx.remote.login.config. login_config_file(string)-
Path to the JAAS configuration file. Equivalent to
-Djava.security.auth.login.config. authorizer(string)-
JMX authorizer class. Set to
org.apache.cassandra.auth.jmx.AuthorizationProxyfor Cassandra integrated authorization. jmx_encryption_options(nested block)-
SSL/TLS configuration for the JMX connection. See JMX With SSL for full configuration options and examples.
Example: local-only JMX with authentication
jmx_server_options:
  enabled: true
  remote: false
  jmx_port: 7199
  rmi_port: 7199
  authenticate: true
  password_file: /etc/cassandra/jmxremote.password
  access_file: /etc/cassandra/jmxremote.access
Example: remote JMX with SSL
jmx_server_options:
  enabled: true
  remote: true
  jmx_port: 7199
  rmi_port: 7199
  authenticate: true
  password_file: /etc/cassandra/jmxremote.password
  jmx_encryption_options:
    enabled: true
    accepted_protocols: [TLSv1.2, TLSv1.3]
    cipher_suites: [TLS_ECDHE_ECDSA_WITH_AES_256_GCM_SHA384, TLS_ECDHE_ECDSA_WITH_AES_128_GCM_SHA256]
    keystore: /etc/cassandra/ssl/keystore.jks
    keystore_password: <keystore_password>
    truststore: /etc/cassandra/ssl/truststore.jks
    truststore_password: <truststore_password>
Example: remote JMX with Cassandra integrated auth
jmx_server_options:
  enabled: true
  remote: true
  jmx_port: 7199
  rmi_port: 7199
  authenticate: true
  login_config_name: CassandraLogin
  login_config_file: /etc/cassandra/cassandra-jaas.config
authorizer: org.apache.cassandra.auth.jmx.AuthorizationProxy|
Hot reloading of the |
Migrating JMX configuration from cassandra-env.sh to cassandra.yaml
If you are currently using the cassandra-env.sh approach (legacy), follow
these steps to migrate to YAML-based JMX configuration:
-
In
cassandra.yaml, uncommentjmx_server_optionsand populate fields to match your current JVM flag settings. Use the field mapping below. -
In
cassandra-env.sh, comment out or remove theconfigure_jmxfunction call. The function definition can remain; only the call must be suppressed. -
Restart the node. Cassandra will use the YAML configuration.
-
Verify JMX connectivity with
nodetool statusbefore proceeding to other nodes.
Field mapping from JVM flags to cassandra.yaml:
| Legacy JVM flag in cassandra-env.sh | cassandra.yaml field |
|---|---|
|
|
|
|
|
|
|
|
|
|
|
|
|
|
|
|
|
|
Standard JMX Auth
Users permitted to connect to the JMX server are specified in a simple
text file. The location of this file is set in cassandra-env.sh by the
line:
JVM_OPTS="$JVM_OPTS -Dcom.sun.management.jmxremote.password.file=/etc/cassandra/jmxremote.password"Edit the password file to add username/password pairs:
jmx_user jmx_passwordSecure the credentials file so that only the user running the Cassandra process can read it :
$ chown cassandra:cassandra /etc/cassandra/jmxremote.password
$ chmod 400 /etc/cassandra/jmxremote.password
Optionally, enable access control to limit the scope of what defined
users can do via JMX. Note that this is a fairly blunt instrument in
this context as most operational tools in Cassandra require full
read/write access. To configure a simple access file, uncomment this
line in cassandra-env.sh:
#JVM_OPTS="$JVM_OPTS -Dcom.sun.management.jmxremote.access.file=/etc/cassandra/jmxremote.access"Then edit the access file to grant your JMX user readwrite permission:
jmx_user readwriteCassandra must be restarted to pick up the new settings.
Cassandra Integrated Auth
An alternative to the out-of-the-box JMX auth is to use Cassandra’s own authentication and/or authorization providers for JMX clients. This is potentially more flexible and secure but it comes with one major caveat: it is not available until after a node has joined the ring, because the auth subsystem is not fully configured before that point. It is often critical for monitoring purposes to have JMX access during bootstrap, so it is recommended, where possible, to use local-only JMX auth during bootstrap and then switch to integrated auth once the node has joined the ring and initial setup is complete.
With this option, the same database roles used for CQL authentication
can be used to control access to JMX, so updates can be managed
centrally using just cqlsh. Furthermore, fine grained control over
exactly which operations are permitted on particular MBeans can be
achieved via GRANT PERMISSION.
To enable integrated authentication, edit cassandra-env.sh to
uncomment these lines:
#JVM_OPTS="$JVM_OPTS -Dcassandra.jmx.remote.login.config=CassandraLogin"
#JVM_OPTS="$JVM_OPTS -Djava.security.auth.login.config=$CASSANDRA_HOME/conf/cassandra-jaas.config"
And disable the JMX standard auth by commenting this line:
JVM_OPTS="$JVM_OPTS -Dcom.sun.management.jmxremote.password.file=/etc/cassandra/jmxremote.password"To enable integrated authorization, uncomment this line:
#JVM_OPTS="$JVM_OPTS -Dcassandra.jmx.authorizer=org.apache.cassandra.auth.jmx.AuthorizationProxy"Check standard access control is off by ensuring this line is commented out:
#JVM_OPTS="$JVM_OPTS -Dcom.sun.management.jmxremote.access.file=/etc/cassandra/jmxremote.access"With integrated authentication and authorization enabled, operators can define specific roles and grant them access to the particular JMX resources that they need. For example, a role with the necessary permissions to use tools such as jconsole or jmc in read-only mode would be defined as:
CREATE ROLE jmx WITH LOGIN = false;
GRANT SELECT ON ALL MBEANS TO jmx;
GRANT DESCRIBE ON ALL MBEANS TO jmx;
GRANT EXECUTE ON MBEAN 'java.lang:type=Threading' TO jmx;
GRANT EXECUTE ON MBEAN 'com.sun.management:type=HotSpotDiagnostic' TO jmx;

# Grant the role with necessary permissions to use nodetool commands (including nodetool status) in read-only mode
GRANT EXECUTE ON MBEAN 'org.apache.cassandra.db:type=EndpointSnitchInfo' TO jmx;
GRANT EXECUTE ON MBEAN 'org.apache.cassandra.db:type=StorageService' TO jmx;

# Grant the jmx role to one with login permissions so that it can access the JMX tooling
CREATE ROLE ks_user WITH PASSWORD = 'password' AND LOGIN = true AND SUPERUSER = false;
GRANT jmx TO ks_user;
Fine grained access control to individual MBeans is also supported:
GRANT EXECUTE ON MBEAN 'org.apache.cassandra.db:type=Tables,keyspace=test_keyspace,table=t1' TO ks_user;
GRANT EXECUTE ON MBEAN 'org.apache.cassandra.db:type=Tables,keyspace=test_keyspace,table=*' TO ks_owner;
This permits the ks_user role to invoke methods on the MBean
representing a single table in test_keyspace, while granting the same
permission for all table level MBeans in that keyspace to the ks_owner
role.
Adding/removing roles and granting/revoking of permissions is handled dynamically once the initial setup is complete, so no further restarts are required if permissions are altered.
See also: Permissions.
JMX With SSL
JMX SSL configuration should be specified in cassandra.yaml under
encryption_options, similar to how client/server_encryption_options
are configured. Using system properties to configure JMX SSL is
considered legacy and only supported for backward compatibility. If SSL
is enabled via both methods, a configuration error will occur at
startup. Hot reloading of the SSLContext is not yet supported for the
JMX SSL.
JMX SSL configuration in cassandra.yaml
Below is an example of configuring JMX SSL in cassandra.yaml
jmx_encryption_options:
    enabled: true
    cipher_suites: [TLS_ECDHE_ECDSA_WITH_AES_256_GCM_SHA384,TLS_ECDHE_ECDSA_WITH_AES_128_GCM_SHA256]
    accepted_protocols: [TLSv1.2,TLSv1.3,TLSv1.1]
    keystore: test/conf/cassandra_ssl_test.keystore
    keystore_password: cassandra
    truststore: test/conf/cassandra_ssl_test.truststore
    truststore_password: cassandra
Below is an example of configuring JMX SSL in cassandra.yaml with password files for keystore and truststore.
jmx_encryption_options:
    enabled: true
    cipher_suites: [TLS_ECDHE_ECDSA_WITH_AES_256_GCM_SHA384,TLS_ECDHE_ECDSA_WITH_AES_128_GCM_SHA256]
    accepted_protocols: [TLSv1.2,TLSv1.3,TLSv1.1]
    keystore: test/conf/cassandra_ssl_test.keystore
    keystore_password_file: test/conf/keystore_passwordfile.txt
    truststore: test/conf/cassandra_ssl_test.truststore
    truststore_password: cassandra
    truststore_password_file: test/conf/truststore_passwordfile.txt
Similar to client/server_encryption_options, you can specify PEM-based
key material or customize the SSL configuration using
ssl_context_factory in jmx_encryption_options.
Below is an example of configuring PEM based key material. You can use keystore_password_file
configuration with in-line PEM as documented priorly in case you have stored the password for the
keystore in a file.
jmx_encryption_options:
    enabled: true
    cipher_suites: [TLS_ECDHE_ECDSA_WITH_AES_256_GCM_SHA384,TLS_ECDHE_ECDSA_WITH_AES_128_GCM_SHA256]
    accepted_protocols: [TLSv1.2,TLSv1.3,TLSv1.1]
    ssl_context_factory:
      class_name: org.apache.cassandra.security.PEMBasedSslContextFactory
      parameters:
          private_key: |
           -----BEGIN ENCRYPTED PRIVATE KEY----- OR -----BEGIN PRIVATE KEY-----
           <your base64 encoded private key>
           -----END ENCRYPTED PRIVATE KEY----- OR -----END PRIVATE KEY-----
           -----BEGIN CERTIFICATE-----
           <your base64 encoded certificate chain>
           -----END CERTIFICATE-----

          private_key_password: "<your password if the private key is encrypted with a password>"

          trusted_certificates: |
            -----BEGIN CERTIFICATE-----
            <your base64 encoded certificate>
            -----END CERTIFICATE-----
(Legacy) JMX SSL configuration with system properties
To turn on SSL this way, edit the relevant lines in
cassandra-env.sh to uncomment and
set the values of these properties as required:
com.sun.management.jmxremote.ssl-
set to true to enable SSL
com.sun.management.jmxremote.ssl.need.client.auth-
set to true to enable validation of client certificates
com.sun.management.jmxremote.registry.ssl-
enables SSL sockets for the RMI registry from which clients obtain the JMX connector stub
com.sun.management.jmxremote.ssl.enabled.protocols-
by default, the protocols supported by the JVM will be used, override with a comma-separated list. Note that this is not usually necessary and using the defaults is the preferred option.
com.sun.management.jmxremote.ssl.enabled.cipher.suites-
by default, the cipher suites supported by the JVM will be used, override with a comma-separated list. Note that this is not usually necessary and using the defaults is the preferred option.
javax.net.ssl.keyStore-
set the path on the local filesystem of the keystore containing server private keys and public certificates
javax.net.ssl.keyStorePassword-
set the password of the keystore file
javax.net.ssl.trustStore-
if validation of client certificates is required, use this property to specify the path of the truststore containing the public certificates of trusted clients
javax.net.ssl.trustStorePassword-
set the password of the truststore file
See also: Oracle Java7 Docs, Monitor Java with JMX
Upgrade Notes: Security Configuration Changes from 5.0 to 6.0
This section summarises operator-critical security configuration changes when upgrading from Cassandra 5.0 to Cassandra 6.0. Misconfiguring either of these items during upgrade can cause outages.
Breaking: native_transport_port_ssl removed (CASSANDRA-19397)
The native_transport_port_ssl configuration property no longer exists in
Cassandra 6.0. Nodes will not start if this property is present in
cassandra.yaml in some configurations, and the dual-server native transport
architecture has been removed entirely.
Before upgrading:
-
Search your
cassandra.yamlfiles fornative_transport_port_ssl. -
If found, remove the property and configure
client_encryption_optionsas described in the removal notice above. -
Update any firewall rules, load balancer configurations, or client driver connection strings that reference the old SSL-only port to point to
native_transport_port(default 9042). -
Set
client_encryption_options.optional: trueduring the transition window to accept both encrypted and unencrypted connections on the single port.
Recommended: Migrate JMX configuration to cassandra.yaml (CASSANDRA-11695)
The cassandra-env.sh JMX configuration approach (configure_jmx function)
still works in Cassandra 6.0, but jmx_server_options in cassandra.yaml is
now the recommended configuration path. The two approaches are mutually
exclusive: enabling both causes a startup failure.
There is no forced migration required for this change. However, operators managing JMX configuration with automation tools (Ansible, Chef, Puppet, etc.) are encouraged to migrate to YAML-based configuration during the Cassandra 6.0 upgrade, as it is:
-
Easier to manage with standard YAML tooling
-
More secure (SSL credentials are not visible in process listings)
-
Consistent with how other Cassandra configuration is managed
See Migrating JMX configuration from cassandra-env.sh to cassandra.yaml for step-by-step instructions.
Additional Notes
native_transport_port_ssl is fully removed in Cassandra 6.0.
All native transport encryption must be configured through the single native_transport_port with client_encryption_options.
JMX can be configured via either cassandra-env.sh (default) or jmx_server_options in cassandra.yaml, but not both simultaneously.
The cassandra-env.sh SSL approach is considered legacy; YAML-based configuration is recommended for new deployments.
Nodetool defaults to JMX port 7199 and accepts -p to override.
It does not read cassandra.yaml or cassandra-env.sh for port resolution — operators must pass the port explicitly if a non-default JMX port is used.
Crypto Providers
Cassandra uses a pluggable crypto provider framework to configure the Java Cryptography Architecture (JCA) provider used for TLS and other cryptographic operations.
The crypto_provider setting in cassandra.yaml controls which provider is installed at startup.
Source: src/java/org/apache/cassandra/security/DefaultCryptoProvider.java, cassandra.yaml trunk
DefaultCryptoProvider (default)
By default, Cassandra uses DefaultCryptoProvider, which installs the Amazon Corretto Crypto Provider (ACCP).
ACCP provides hardware-accelerated cryptographic operations and is generally faster than the default JRE provider for TLS handshakes and bulk encryption.
Platform support:
-
x86_64 — fully supported
-
aarch64 — fully supported
-
Other architectures — ACCP is not available; Cassandra falls back to the JRE default provider automatically
If ACCP fails to load (unsupported platform, missing native library, or other error), Cassandra falls back to the default crypto provider in the JRE and logs a warning.
To force startup failure when ACCP cannot be installed, set fail_on_missing_provider to true in the crypto_provider configuration:
crypto_provider:
  class_name: org.apache.cassandra.security.DefaultCryptoProvider
  parameters:
    fail_on_missing_provider: true
Bypassing ACCP with JREProvider
To skip ACCP installation entirely and use only the JRE’s built-in crypto provider, configure JREProvider:
crypto_provider:
  class_name: org.apache.cassandra.security.JREProvider
This is useful when:
-
Running on a platform where ACCP is not supported and fallback logging is undesirable
-
Organizational policy requires a specific JCA provider configured at the JVM level
-
Debugging TLS issues where ACCP behavior needs to be ruled out
Custom Crypto Providers
To use a custom JCA provider, extend AbstractCryptoProvider and specify the fully qualified class name in cassandra.yaml:
crypto_provider:
  class_name: com.example.MyCryptoProvider
  parameters:
    # provider-specific parameters
The custom provider JAR must be on the Cassandra classpath (typically placed in the lib/ directory).